
In the realm of online gaming, the allure of crafting your own gaming experience, tailored to your preferences and those of your friends or community, is unparalleled. Enter Palworld, an exciting new addition to the gaming universe, offering a unique blend of creativity, strategy, and adventure. Whether you’re a seasoned gamer or a newcomer to the scene, the prospect of setting up your own Palworld dedicated server opens up a world of possibilities. This comprehensive guide aims to demystify the process, providing you with step-by-step instructions, troubleshooting tips, and advanced configurations to ensure a seamless experience from start to finish.
Palworld Server Requirements
Before delving into the intricacies of setting up your Palworld dedicated server, it’s essential to ensure that your system meets the necessary requirements for smooth operation. Here’s a breakdown of the key specifications:
- CPU: A minimum of 4 cores is recommended to handle the server load efficiently.
- RAM: While 16GB is recommended, opting for over 32GB ensures stable performance, particularly during extended gameplay sessions.
- Network: Palworld operates on UDP Port 8211 by default, necessitating port forwarding for external connections.
Methods for Setting Up Your Palworld Dedicated Server
Method 1: Utilizing Steam
Setting up your Palworld dedicated server via Steam provides a straightforward and user-friendly approach. Follow these simple steps to get started:
1.Search for Palworld Dedicated Server in the Steam Library:
- Open Steam and navigate to the Library tab.
- Use the search bar to locate “Palworld Dedicated Server.”
- Ensure that the tool is selected in the filter settings if not readily visible.
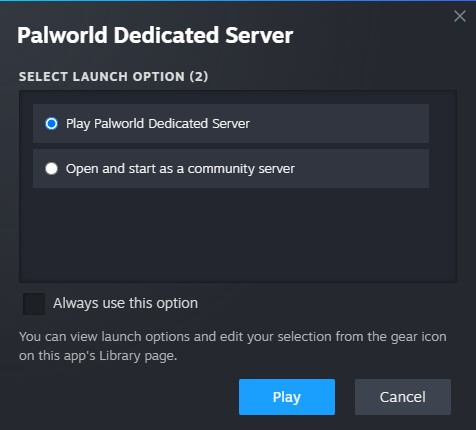
2.Launch the Dedicated Server:
- Once located, select “Palworld Dedicated Server” from the list.
- Click on the “Play” button to initiate the server launch process.
3.Verify Server Startup:
- Upon successful startup, a dialog box confirming the launch will appear.
- Ensure proper connectivity by attempting to connect to the server from the game client.
Method 2: Deploying via SteamCMD
For users preferring a more hands-on approach, utilizing SteamCMD offers greater control over the setup process. Follow these instructions tailored for Windows and Linux environments:
Windows:
Install and Configure SteamCMD:
- Download SteamCMD from the official Valve website and install it on your system.
- Open Command Prompt as an administrator.
Download Palworld Dedicated Server Files:
- Execute the following command in the Command Prompt:
steamcmd +login anonymous +app_update 2394010 validate +quit
Navigate to Installation Directory:
- Once the download is complete, navigate to the installation directory using the Command Prompt:
cd C:\path\to\steamapps\common\PalServer
Launch the Server:
- Execute the PalServer.exe file to launch the Palworld dedicated server.
Linux:
Change to the download directory.
Usually under the user’s home directory, but if you have set up an installation directory for SteamCMD, please refer to it.
cd ~/Steam/steamapps/common/PalServerTo start the server, exec the PalServer.sh script.
./PalServer.shThe following message may display after startup, but it does not interfere with server operation.
.steam/sdk64/steamclient.so: cannot open shared object file: No such file or directoryThis can be fixed by performing the following stepsIf this procedure is performed after the server is operational, the game will start from character re-creation.
We recommend that you do not perform this on servers that are already in play.
mkdir -p ~/.steam/sdk64/
steamcmd +login anonymous +app_update 1007 +quit
cp ~/Steam/steamapps/common/Steamworks\ SDK\ Redist/linux64/steamclient.so ~/.steam/sdk64/
Error is displayed once at startup. if .steam/sdk64/steamclient.so OK. (First tried local 'steamclient.so') is displayed, there is no problem.
$ ./PalServer.sh
Shutdown handler: initalize.
Increasing per-process limit of core file size to infinity.
dlopen failed trying to load:
steamclient.so
with error:
steamclient.so: cannot open shared object file: No such file or directory
[S_API] SteamAPI_Init(): Loaded '/home/ubuntu/.steam/sdk64/steamclient.so' OK.  (First tried local 'steamclient.so')
Advanced Options and Troubleshooting
For users seeking further customization or encountering connectivity issues, advanced options and troubleshooting steps are available:
- Adjusting Server Parameters:
- Modify server parameters such as listening port and maximum player count using command-line options.
- For example, use
--port <port_number>to change the listening port (default: 8221). - Troubleshooting Connectivity:
- Verify IP settings and ensure proper port forwarding for external connections.
- Address connection issues by checking Windows security settings and verifying the accuracy of IP addresses.
Method 3: Leveraging WindowsGSM
WindowsGSM provides a convenient platform for managing game servers, including Palworld dedicated servers. Follow these steps to streamline the setup process:
- Download and Install WindowsGSM:
- Visit the official WindowsGSM website and download the latest version of the software.
- Install WindowsGSM on your system following the provided instructions.
- Install Palworld Plugin:
- Download the Palworld plugin from the official source or GitHub repository.
- Extract the plugin files and move them to the WindowsGSM plugins directory.
- Configure WindowsGSM:
- Launch WindowsGSM and navigate to the plugins section.
- Install the Palworld plugin and configure server settings as desired.
- Deploy Palworld Dedicated Server:
- Use the WindowsGSM interface to install and manage your Palworld dedicated server effortlessly.
Method 4: Palworld Dedicated Server Hosting
For those seeking a hassle-free solution or lacking the technical expertise to set up a server independently, Palworld dedicated server hosting offers a viable alternative. Benefits of opting for hosting services include:
- Dedicated Resources: Enjoy dedicated RAM and CPU cores for optimal performance.
- DDoS Protection: Benefit from built-in DDoS protection to safeguard against external threats.
- Automated Cloud Backups: Ensure data security with automated cloud backups for peace of mind.
- Full Server Control: Retain full control over your server settings and configurations without fixed game slots.
Configuring Your Palworld Server
Once your Palworld dedicated server is up and running, it’s crucial to configure it according to your preferences and requirements. The server configuration file, located at steamapps/common/PalServer/DefaultPalWorldSettings.ini, allows for fine-tuning of various parameters such as difficulty settings, player limits, and server descriptions.

Leave a Reply